Showing posts with label baked. Show all posts

21 May 2012

Homemade French Bread

I try my best to make Sunday dinners the best of the week. This Sunday, I fell flat on my face. While getting ready for church and thinking of my day I went to plan dinner in my much too busy brain. I quickly realized we had nothing good to eat!

No chicken
No beef
No nothing!

I don't go shopping on Sunday because I like to spend as much time as possible with the family. Running to the store was not an option. I chose to forget about it until we got home from church and then I'm sure I could com up with something to satisfy my hungry husband.

After a great church meeting and beautiful walk home. (we love having our meeting house only blocks away!) I got to work. Out came the spaghetti and pasta sauce. Not the greatest but it worked. When I told Mike that's what we were eating he was happy but asked if there was anyway we could do garlic bread with it. :)

Enter wife who always wants to impress her husband even if she fails!

I told him to grab a snack and put on a movie because that would take some time.

Now enter the google search and steamykitchen.com

You can go to her direct site to view the recipe or check it out below!

French Bread

4 cups bread flour
2 teaspoon active quick rising dry yeast
2 teaspoon salt
1 1/2 cups warm water
1. Put 1/4 cup of bread flour on your clean counter top and reserve. Place remaining 3 3/4 cups bread flour in your mixer bowl. Spoon the yeast on one side of the bowl, and the salt on the other side. Pour in the warm water and with your regular mixer paddle, mix on low speed until the dough comes together in a mass. Switch to the dough hook. Mix on medium speed for 2 minutes. Dough should clear the sides but stick to the bottom. If it is too sticky, add 1 tablespoon of flour at a time. If too dry, add 1 tablespoon of water to dough to adjust.
Let the dough rest for 5 minutes.

2. Turn the mixer on again and mix for 3 minutes. Take the dough out and place on the counter. Remember that 1/4 cup of flour that we reserved? We’ll use it now. As you knead the dough by hand, incorporate more flour as you need.
Knead by hand until the dough is very satiny, smooth, tight and formed into a nice, compact ball.

3. Place this dough in a large lightly oiled bowl (I use Pam spray). Turn dough over so that all sides have a thin coating of oil. Cover with plastic wrap and set in warm place for 1 1/2 hours to let rest and rise. Dough should almost double in size. While the dough is rising, about 1 hour into the rising stage, preheat your oven to 450F and place your pizza stone, inverted baking sheet or covered cast iron pot into the oven to heat up.
4. After the dough has risen fully, punch dough down and form back into a ball. Poke your finger on the surface – the dough should give into the pressure and slowly creep back up.
5. Ok, here’s the fun part. Cut the dough into half – you’ll shape one half at a time (keep the other piece under wraps) Pick up the dough – stretch it out until it forms a big rectangle. Dust your work surface with flour and fold over the ends of the dough like this:
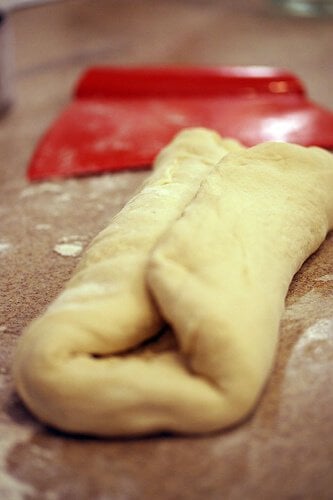
 photo from steamykitchen.com

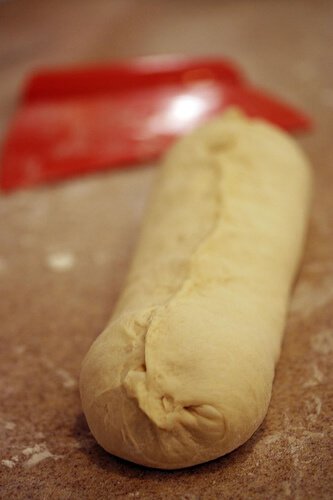
Now do a little “karate chop” lengthwise down the middle of the bread and stretch out the long ends again. Fold over in half. The karate chop helps get the middle tucked inside. Pinch all sides shut. This is important – you want to make sure that all ends including the short ends are pinched tightly to create a seal. This allows the bread to rise & expand up and out evenly. If the bread looks a little lopsided, you can try to fix it by letting it rest 5 minutes and gently stretching it out again. Just don’t knead the dough again – you’ll pop all the beautiful gas that took 1.5 hours to create!
Here’s what it should look like:

  photo from steamykitchen.com
6. Turn the bread over so that it is seam side down. Cover the loaf with a damp kitchen towel. Repeat with the other dough ball. Leave the loaves to rest on your well-floured pizza peel or cutting board for 30 minutes. After resting, take a sharp paring knife and make 3-4 shallow, diagonal slashes on the surface of the loaf. This allows the steam in the bread to escape so that it expands evenly during the baking process.
7. When you are ready to bake, remove your baking vessel from oven. Carefully slide the gorgeous loaf into or onto your baking vessel. I like baking one loaf at a time.  The most important equipment to have is an instant read thermometer to measure temperature of the bread.

You can probably fit both loaves on it at the same time if you wish. -> Get a 1/2 cup of water ready next to the stove. Open the stove, put your bread in the oven and throw the water on the oven floor. Immediately close the oven door. This creates your steam. -> Bake 20-25 minutes. Check temperature of the bread – internal should be 190-210F. Remove and let cool before cutting into it.
this is my finished product! 

I was very happy with how this turned out! Mike loved it and both loaves were devoured so fast. It went great with our last minute, horribly planned dinner. :)

04 May 2012

Cinnamon-Sugar Pull Apart Bread

I woke up early on a Friday morning and felt inspired (ok, maybe that was hunger speaking) so out came a mixing bowl and goodness began! 

 How is that not calling all of you! "Eat me"

If only I could send you a smidgeon of the glorious scent that filled our new apartment while this was baking. Mike kept asking if it was done yet. He's just like a little kid! 

After having some of this goodness Mike commented on how great it would be to take to a get-together or party. We always have a BBQ with other players on the football team and I think this might be coming with us this year. 

So here is my confession with this recipe -- this was my first time using yeast and I was really nervous. For some reason I've always been intimidated by it but it was nothing to even worry about!  

Cinnamon and Sugar Pull-Apart Bread
Dough
2 3/4 cup divided, plus 2 Tbsp. all-purpose flour
1/4 cup sugar
2 1/4 tsp. active dry yeast (1 packet)
1/2 tsp. salt
4 Tbsp. butter
1/3 cup whole milk
1/4 cup water
1 tsp. pure vanilla extract
2 eggs (at room temperature)

Filling
1 cup sugar
2 tsp. cinnamon
1/4 tsp. nutmeg
4 Tbsp. butter, melted

Mix 2 cups flour, sugar, yeast and salt into a large mixing bowl. Set aside. 

 There is yeast in there!! (Excuse my excitement)

Melt butter and milk in a small sauce pan. Once the butter is completely melted remove from burner and add in water and vanilla. Let cool for 5 min. 

Pour the cooled milk mixture into the bowl of dry ingredients and mix well. Beat the eggs and add them too -- keep mixing. 

Add in the 3/4 cup flour and mix well. If this is very sticky--it's perfect!  

Place the dough in a medium sized greased bowl. Cover this with wrap and allow to rise in a warm place for 30-45 min. 

The dough should about double in size. Now kneed in 2 Tbsp. flour and cover again, allowing it to rise again for about 5-10.

While that is rising away start on the filling. Mix sugar, cinnamon, and nutmeg together in a small bowl. 

Once the dough is ready to go roll it out on a floured surface. Brush (or spoon and awkwardly spread if you can't find your brush) the melted butter over your rolled out dough. Cover it all really well with the sugar mixture. 


Now cut the bread into about 2 inch strips using your pizza cutter. Again cut those strips into equal sized squares. 

Stack the bread and place it into your greased pan. I used a deep glass pie pan but you could use a bread pan too. Cover the dough and let rise for 10-15 min. 


Preheat the oven to 350.

Sprinkle the rest of your sugar over the top and pop this in the oven for 30-35 min. 

Let cool for just a min and enjoy!  


We got a little excited and maybe grabbed a few pieces before they were cool yet. We had to play to 'hot food in mouth' game. What would you do with something that good in from of you?? 

19 March 2012

Cream Cheese Cookies

While "pinteresting" the other day I stumbled upon this little gem of cream cheese cookies! Now I'm partial to the classic family of cookies but every once in a while I like to venture beyond the chocolate chip world and see what happens.

I was pleased!

thanks to the girl creative for this recipe

1/2 cup unsalted butter (room temp)
3 oz. regular cream cheese (room temp)
1 1/2 cups powdered sugar
1/2 tsp. baking powder
1 egg (room temp)
1/2 tsp. vanilla extract
1 3/4 cups flour

Heat oven to 375 degrees. 

Mix together butter and cream cheese and beat for 1 min. Beat in sugar and baking powder. Add egg and vanilla, mix well. Beat in the flour. Chill for 30 min. Scoop rounded teaspoons and roll in sugar to coat before placing on parchment covered cookie sheets. 

Bake for 7 min. Cool for a min and then transfer to cooling rake. 

You can also cut out the cookies but chill for 1 hour if you choose this route. I'm an impatient baker so I went with the drop cookie version. 

Now once my first sheet came out I was a little worried because they didn't spread. They stayed just about as round as when I first put them on the sheet. But they tasted great! My husband loved them cold. So I put them in a zip bag and threw them in the fridge. They really are great chilled. :)

Super dense and soft on the inside with a perfect crunch on the outside. I'M IN LOVE!! I only wish I would have added a little food coloring for St. Patty's day. Maybe next time!